RENEE FORD METALS
  • home
  • shop
  • about
  • custom design
  • contact
  • set-it! instructions
  • hold-it! instructions
  • teaching
  • The Hammer and Anvil
  • the journal

the journal
occasional musings of my obsession with metal

​

NEW! Gravée collection

It's about to get real!

9/23/2013

1 Comment

 
PictureNew grill selfie :)
Week three, you kicked my ass.  Woah.  That was a rough road we traveled this week.  Tears were shed, tantrums were thrown, frustrations took over.  But we all made it through the battle and all are better jewelers for it.

It is amazing what some of the students who have never picked up a saw frame or even a file can do after just three weeks.  It's really incredible and wonderful to experience.  Blaine is our Miyagi, our Mickey or our Morpheus.  The confidence gained through the program is very empowering. 

Then he gave us a test... Well, you have to gauge progress some how, don't you?  Oh deer-in-the-headlights.


Beginning of Week Three

We started off the week with bead setting and channel setting round stones into bands.  Bead setting was quite the challenge but actually came together pretty well.  It's so much simpler to learn with huge screens showing you a step by step process broken down into parts.  It takes away the fear of too much information all at once and then trying to repeat it at your bench.  Blaine's approach to channel setting was a simple and clean technique that I have done a little before the program but not with the control he teaches.  The little things make all the difference.  It's in the details.  It really is.
Picture

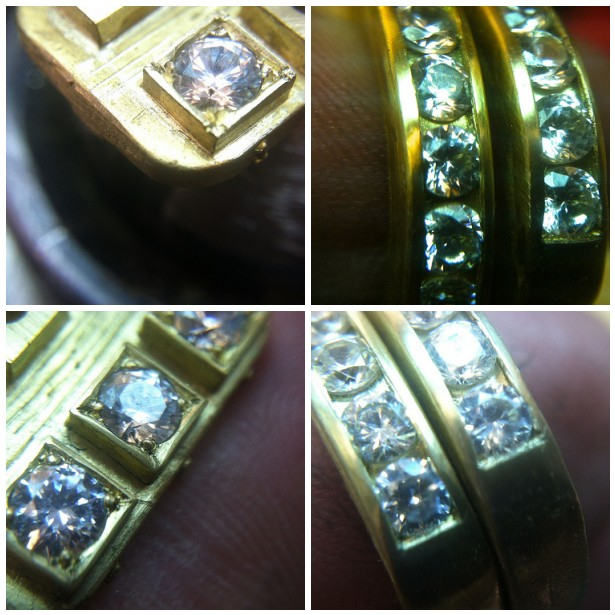
Bezel setting came in between bead setting styles.  This technique is explained in great detail on Blaine's DVDs.  I learned a lot of my stone setting from these DVDs.  They are a very clear and descriptive way to learn bezel setting and flush setting.  Learning in class was similar to the video but on steroids.  Blaine teaches this in the Stone Setting Comprehensive week long class. 

Picture


Mid Week Three- Bead Setting Style 2

Here is where it started to get real for me.  This is the beast that kicked my ass this week.  I understood and felt good about bead setting the traditional method. (Style 1)  I understood bead setting Style 2 (Style 2 = Fancy Pants Style.)  Putting into practice was the difficult part.  Graver control is key.  I was swerving all over the road.  I could have easily gotten a DUI the way I was driving that graver.  Sigh.  I went home that day all frustrated, exhausted and a little bit pissed that I couldn't get it right away. 

End of Week Three

The next day, I came in determined to get it right.  Before I could even get in another practice stone, we jumped right into milgraining the edges after some minor shaping and clean up.  Milgraining is a beautiful thing.  It adds a little beaded rim to frame your bead set stone.  (It also is a wonderful concealer to hide blemishes that never seem to go away.)  It is done with a tiny little wheel that reminds me of a ravioli or pastry wheel just on a micro level.  It makes your stones pop, stand out and elegance to the piece.  I've used it before but not with bead setting.  I will be using it more often in my work as the look appeals to me.
Picture

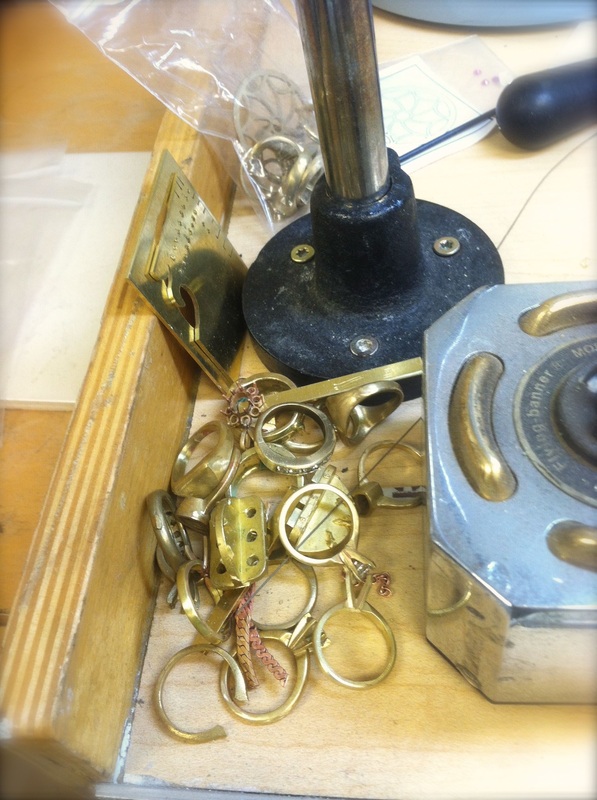
The week is rolling along with it's own set of troubles and then it happenened.  We were surprised with a test.  But not on what we have been working on all week but something we learned in week two.  That was a thousand years ago!!  The pressure!  We were challenged with replacing a head on a solitaire ring and resetting the stone.  Ok, breathe.  Just unsolder and put it back together with the new one.  Well, this ring is not soldered, it's laser welded and we have to cut it out.  Now it got interesting.  We weren't supposed to ask questions or share info with each other.  I struggled through but remembered to just step back and examine what is at hand.  With some brief calming exercises, I tackled the task successfully in the end.  

Picture
My projects from week 1 through week 3.
Picture
My awesome bench neighbor, Nick, and his collage of projects. Check out his amazing wire wrapping! www.noyesdesigns.etsy.com

Whew!  With that behind us we dove into chain repair, a non-stressful repeat of the solitaire exercise, and a little sneak peek at ingot making closed out the week.  I know I was ready for the weekend.  Week three, you were quite the evil little beast but I know I am better for having gone through you.  Margarita time!  Off to celebrate my beautiful little girl, Ruby, turning 9.  Wow.  How does that happen? 

Picture
1 Comment
cari-jane link
9/23/2013 10:50:35 am

I'm REALLY enjoying your updates! Wish I could be sitting in there with you learning all this great stuff.

Reply


Leave a Reply.

    Picture

    Renee Ford

    Metalsmithing maven and mind behind Renee Ford Metals.  I make the plain look interesting with fire, hammers & cool tools.


    Archives

    February 2024
    May 2017
    May 2016
    February 2016
    May 2015
    November 2013
    October 2013
    September 2013
    February 2012

    Categories

    All
    Booth Design
    Exhibitor Design
    Jewelers Bench School
    Jewelry
    Jewelry Booth
    Jewelry Exhibitor
    Jewelry Making
    New Approach School For Jewelers
    Panicmama Jewelry
    Renee Ford
    Trade Show Booth
    Website Building For Beginners

All jewelry is handmade in Nashville, Tennessee.  I use recycled, responsibly sourced metals + gemstones.  All designs + images are property of
Renee Busdiecker and Renee Ford Metals 2025
  • home
  • shop
  • about
  • custom design
  • contact
  • set-it! instructions
  • hold-it! instructions
  • teaching
  • The Hammer and Anvil
  • the journal